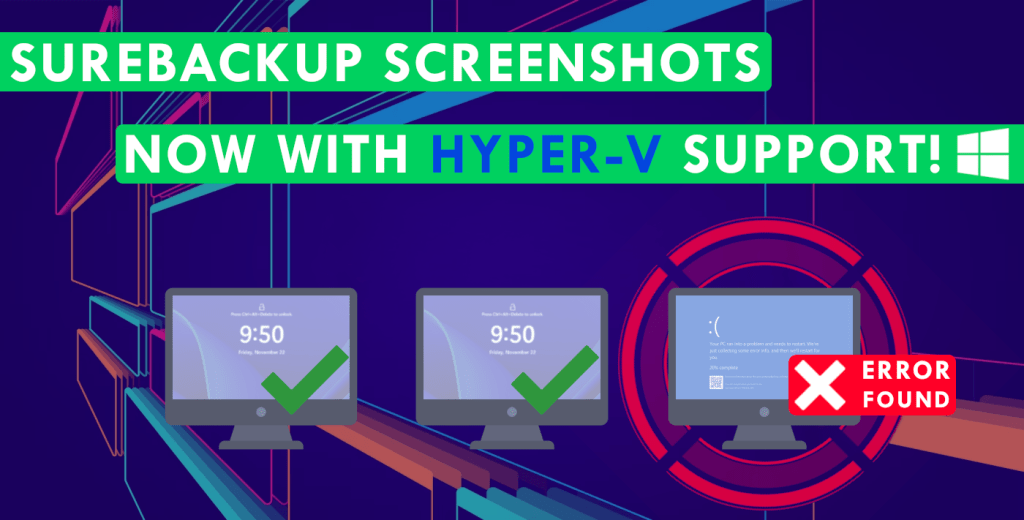
Almost a year ago now, I embarked on a project with the goal of making SureBackup jobs easier to troubleshoot when something goes wrong. What resulted was a solution that adds screenshot capture functionality to SureBackup jobs, giving you an insight into why your protected workloads failed to boot correctly.
You can check out the original blog post for that project below.
https://benharmer.blog/2025/06/18/troubleshooting-just-got-easier-with-surebackup-screenshots/
If you haven’t seen it already, it’s worth a read to get an understanding of how it came about – and if VMware is part of your stack, this is definitely worth a look.
A lot has changed since my original post, with the IT landscape continuing to evolve around us. We’ve seen a big shake up in the hypervisor space recently with many companies looking at their options post the Broadcom acquisition, with vendors like Hyper-V and Proxmox becoming real contenders in the market. There have also been a number of key updates across Veeam’s product portfolio over the past year, including the introduction of V13.
These developments, combined with the positive feedback the project received from the Veeam community inspired me to continue development of the project, with the aim to expand its support beyond just the VMware platform.
To that end, I’m excited to announce a new release that not only addresses limitations from the previous version but also introduces Hyper-V compatibility!
Check out the full solution below including step by step instructions on how to setup SureBackup Screenshots in your Hyper-V environment.
Pre-requisites
First let’s have a look at what’s required for this to work:
- Veeam Backup & Replication v13 running on Windows – the triggering of the script uses the Windows event log which means it isn’t compatible with the V13 VSA for now
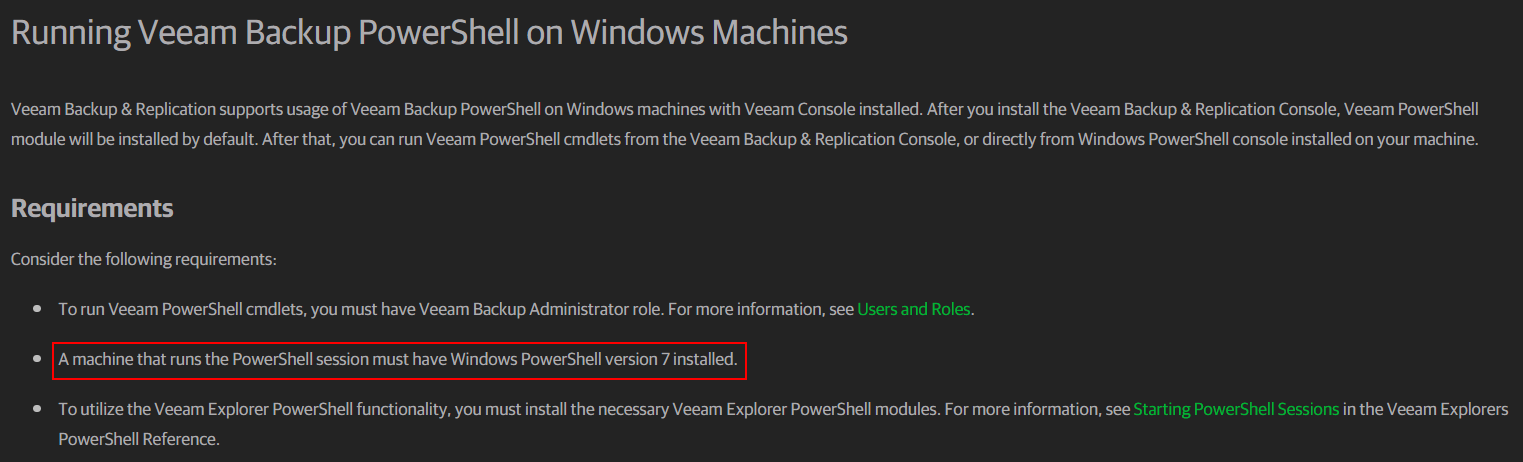
- PowerShell 7 installed on VBR Server – this is a new requirement for V13 and since PowerShell 7 isn’t bundled with even the most recent Windows Server OS, it will need to be downloaded and installed.
 The script below should still work on V12 which only requires PowerShell 5.1, however I haven’t tested this to confirm.
 - Hyper-V host & Hyper-V Virtual Lab configured in VBR – This has been tested with Hyper-V running on Windows Server 2025, but it should work with previous versions of Windows as well.
- SureBackup Job configured with Hyper-V Virtual Lab – the script supports any number of simultaneous machines being processed in the SureBackup job
- VBR & Hyper-V Host credentials stored in encrypted format (more on this below)
- Windows Remote Management configured between Hyper-V host and VBR server – this ensures the VBR server can run PowerShell commands on the Hyper-V host.
- Script must run locally on the VBR server
The Script
The process of programmatically taking a screenshot of a VM console with Hyper-V is a bit different compared to the VMware script. The lack of a dedicated screenshot API in Windows meant that reproducing the same functionality required much more work for Hyper-V – what was previously 3 lines of code has now become 27 lines!
However the good news is that the workflow remains almost the same as before:
- Retrieves event log ID from scheduled task
- Creates a working directory to store the screenshots and credential files (and optional logs)
- Imports VBR & Hyper-V credentials
- Gets associated SureBackup job ID
- Connects to VBR server
- Gets SureBackup job details including associated Virtual Lab
- Gets Hyper-V host linked to the Virtual Lab
- Checks event log to see if SureBackup job has finished – if true moves to last step
- Connects to Hyper-V host and looks for powered on VMs suffixed with SureBackup job name
- For each VM found
- Takes screenshot of the VM console
- Stores image on VBR server
- Checks the image file integrity
- Repeat steps 9 & 10 (every 30 seconds) until SureBackup job finished
- Disconnect from VBR session
Process Walkthrough
1. Copy the script
On your backup server open your text editor of choice.
Next click here and copy the contents of the script into your text file.
Now save the file somewhere on your backup server with a ps1 extension.
The script may look quite daunting but the good news is that there are no changes that need to be made – all the data we need is extracted straight from the VBR.
2. Working directory
By default the working directory is set to C:\Scripts\SureBackup_Screenshots (if the directory doesn’t exist it will be created).
If you do want to change the path, find the below line near the top of the script and change the path between the quotation marks.
$workingDir = “C:\Scripts\SureBackup_Screenshots”
3. Create encrypted credentials
To prevent sensitive information being stored in plain text, all credentials are imported into the script from encrypted files. These files must be created using the same account that the scheduled task runs under (more on this below) for the script to import the credentials successfully.
You can use the example scripts below to create these files – if you changed the working directory in the previous step, update below script to reflect the correct directory.
VBR Credentials
$veeamCredentials = Get-Credential
$veeamCredentials | Export-CliXml -Path "C:\Scripts\SureBackup_Screenshots\veeam_creds.xml"
- Provide an account with the Veeam Backup Administrator role
- This account must be configured as a service account – MFA enabled accounts cannot connect via PowerShell.
Hyper-V Credentials
$hypervCredentials = Get-Credential
$hypervCredentials | Export-CliXml -Path "C:\Scripts\SureBackup_Screenshots\hyperv_creds.xml"
- Using a local or domain admin user is the preferred option to connect to the Hyper-V host since all required permissions should already configured.
4. Optional Steps
Enable Logging
If you find the script isn’t capturing screenshots as you would expect, you can enable logging to check for errors and pinpoint what went wrong.
- Find the line $debug = 0 near the top of the script
- Change 0 to 1 and save the file
- Log files are suffixed with a timestamp and stored within the working directory.
PowerShell Remote Management
If your Hyper-V host is not joined to the domain, you may run into problems when the script tries to connect it via Remote Management.
If you are using credentials other than the built-in local admin account, the script will likely fail to connect to the remote server. I was able to resolve this by adding the below registry key:
Key: HKEY_LOCAL_MACHINE\SOFTWARE\Microsoft\Windows\CurrentVersion\Policies\System
DWORD Value: 1
With the above in place, the script was still failing with this error:
OpenError: [hyperv.homelab.kiwi] Connecting to remote server hyperv.homelab.kiwi failed with the following error message : The WinRM client cannot process the request. If the authentication scheme is different from Kerberos, or if the client computer is not joined to a domain, then HTTPS transport must be used or the destination machine must be added to the TrustedHosts configuration setting. Use winrm.cmd to configure TrustedHosts. Note that computers in the TrustedHosts list might not be authenticated. You can get more information about that by running the following command: winrm help config. For more information, see the about_Remote_Troubleshooting Help topic.
If you come across this, you can configure the Hyper-V host as a trusted host by running this command on the VBR server:
Set-Item “WSMan:localhost\Client\TrustedHosts” -Value “<Hyper-V Host FQDN/IP>”
5. Setup Scheduling
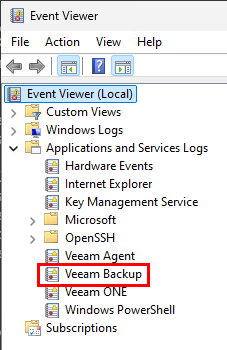
Managing the execution of the script is handled by a scheduled task. Most VBR specific events that occur are logged in the Windows Event Log on the backup server including those relating to SureBackup – this is what we’ll use to trigger our task.
Creating the scheduled task requires a little bit of work up front but only needs to be completed once.
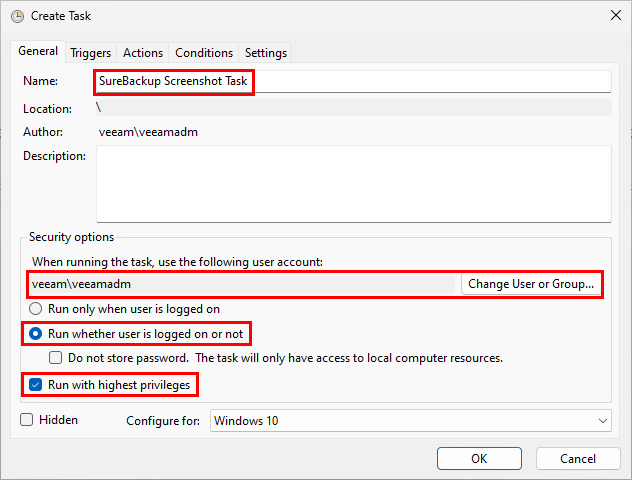
Start by opening task scheduler and creating a new task. On the General tab give the task a name.
Under the Security options section set the user account, making sure it has local administrator rights – this account must be the same account used to create the encrypted credential files earlier in step 3.
Ensure the Run whether user is logged on or not option is selected and ensure Run with highest privileges is checked.
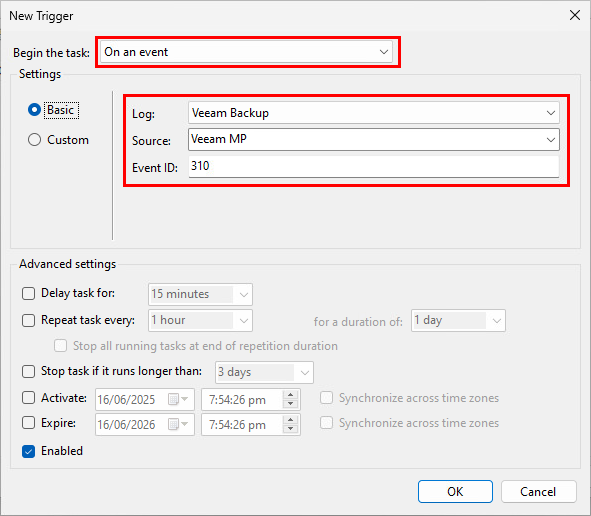
On the Triggers tab click New and set the following options:
- Begin the task: On an event
- Log: Veeam Backup
- Source: Veeam MP
- Event ID: 310 (corresponds to ‘SureBackup Job Started’)
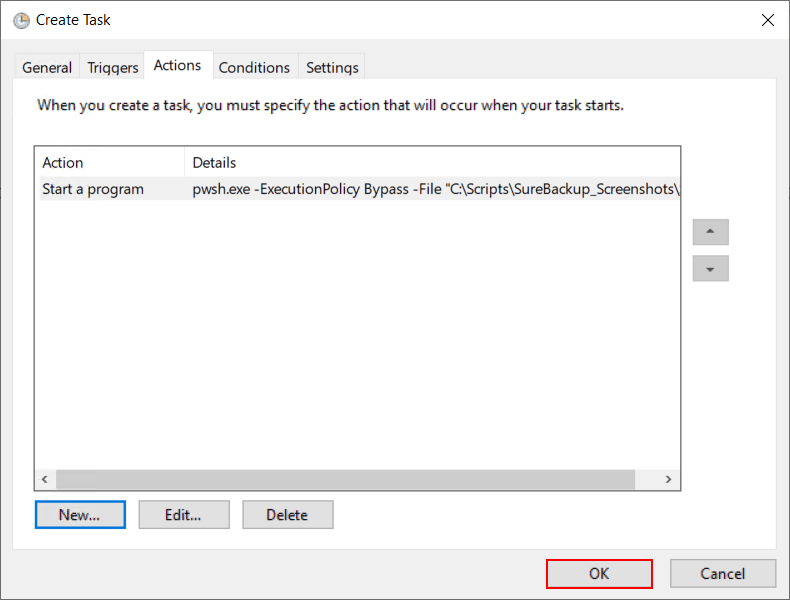
On the Actions tab click New and set these options:
- Action: Start a program
- Program/script: pwsh.exe
- Add arguements: -ExecutionPolicy Bypass -File “<path to powershell script>” -eventRecordID $(eventRecordID)
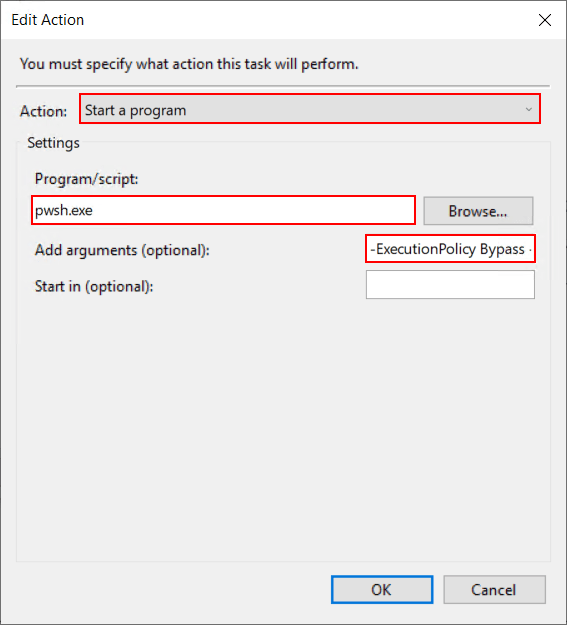
There’s a fair bit going on here so let’s break it down to understand what it all means.
- pwsh.exe – this is a key change from before where powershell.exe was used. This new executable file name ensures the script is runs with PowerShell 7.
- -ExecutionPolicy Bypass – by default the Execution Policy for Windows Servers is “RemoteSigned” which prevents scripts that aren’t digitally signed. Specifying “Bypass” allows the script to run but only under context of the scheduled task without having to change the global Execution Policy configuration on your system.
- -file “<path to powershell script>” – the file parameter allows you to specify the path of a PowerShell script to run within the session. Enter the path to the PowerShell script you saved on your backup server in Step 2 earlier.
- -eventRecordID $(eventRecordID) – this relates back to the first few lines of the PowerShell script which is expecting a parameter to be passed to it when called. This will make more sense in a few moments when we configure the task to return an Event ID.
After clicking OK to the above window, click OK once more and finally when prompted, enter the credentials of the account selected in the earlier step to create the task.
That’s the bulk of the work complete but we need to complete one last step so that the Event ID can be passed through to the script.
First export the scheduled task out to a file (right click task > Export) and open it in a text editor.
Next we need to add the below lines into the EventTrigger section of the file then save it.
      <ValueQueries>
        <Value name="eventRecordID">Event/System/EventRecordID</Value>
      </ValueQueries>
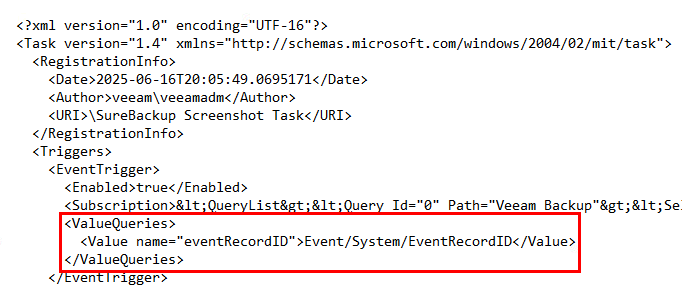
- Value name=”eventRecordID” – this value should match the parameter name configured during the creation of the scheduled task.
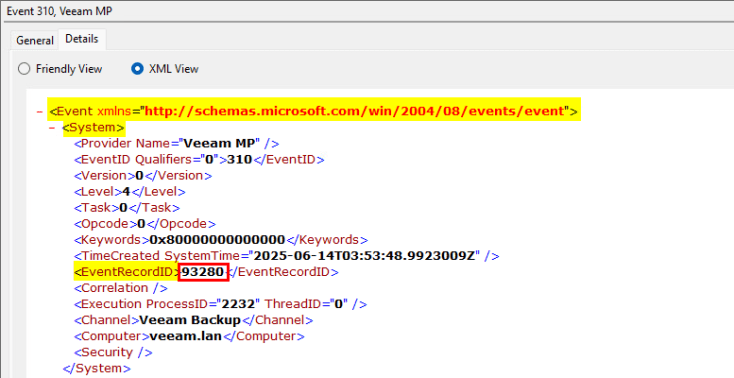
- Event/System/EventRecordID – this relates to the value we want to pass from the task into the script as highlighted below.
Before we can import the modified XML file back in, first delete the existing task (right click task > Delete).
Now import the task back in using the Import Task option – no edits need to be made on the Create Task window, just click OK and re-enter the credentials.
6. Triggering the Script
Let’s see what this looks like in action by running a SureBackup job. For the techies among us, I’ve enabled logging in the script so we can see what’s going on in the background.
Shortly after the SureBackup job is started, the scheduled task gets triggered which runs the script. At this point a log file gets created in the working directory.
One of the first things we see when opening that log is a summary of the Windows event that triggered the scheduled task. The vital piece of information here is the SureBackup Job ID which will be used to capture details from the Sure Backup job itself.

The next few lines show the data pulled from the SureBackup job that will be used when generating the screenshots.

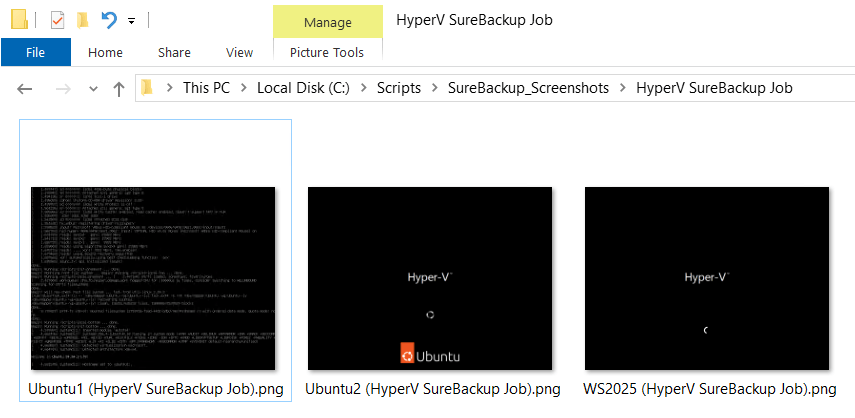
Now we get to the stage where the script starts checking the Hyper-V host for VMs associated with the SureBackup job. You can see below it found 3 VMs on the first run and copied the screenshots onto the VBR server:

If we open up Windows Explorer you can see the image files show the current state of each VM. At this point they are going though the boot process still.
30 seconds later the script repeats the above process – any VMs with screenshots that already exist are updated with the latest ones. This process continues over and over until the SureBackup job completes, which generates an entry in the Windows Event Log (ID 390) and terminates the script.

If we have a look at the result of the SureBackup job, it shows that the WS2025 VM failed the heartbeat check indicating something went wrong while booting that machine:

If we switch back to Windows Explorer once more, you can see from the final set of screenshots that the associated VM shows a BSOD:
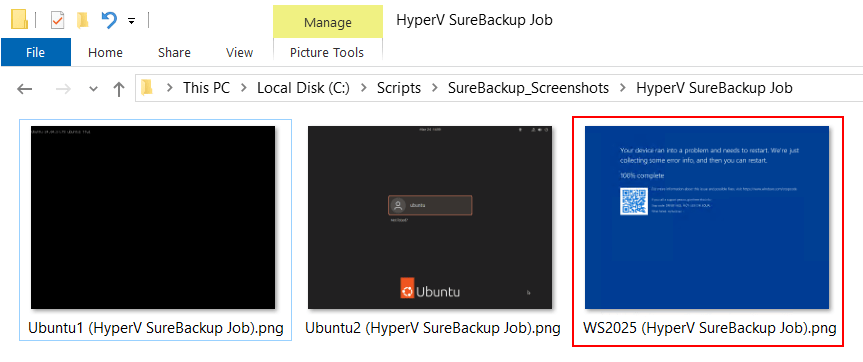
In these types of scenarios where a machine fails to boot, having this information at hand can quickly help pinpoint the underlying issue, saving you from digging through log files or re-running verification tests.
Wrap Up
Adapting the workflow of the original SureBackup screenshot script to work with Hyper-V definitely came with its fair share of challenges but turned after some perseverance, it turned out to be an interesting and worthwhile project.
With this update, the solution now provides full parity for SureBackup screenshot functionality on both VMware and Hyper‑V Virtual Labs. This complete solution now allows administrators to benefit from a consistent and reliable way to understand exactly what’s happening inside their verification jobs, no matter the underlying platform.
Whether this functionality eventually becomes part of the VBR product remains to be seen, but I genuinely believe it adds real value and hope to see it’s inclusion be considered in a future release.
Full Script
#pass EventRecordID into script
param(
    $eventRecordID
)
$workingDir = "C:\Scripts\SureBackup_Screenshots" #set working directory
if (-not (Test-Path -Path $workingDir))
{
    New-Item -Path $workingDir -ItemType Directory
}
Add-Type -AssemblyName System.Drawing #import drawing package
$debug = 0 #set to 1 to output to log file
if ($debug = 1)
{
    Start-Transcript -Path "$workingDir\debug_$(Get-Date -f 'yyyy-MM-dd-HH-mm-ss').log"
}
Function Get-VMScreenshot {
    param(
        [Parameter(Mandatory)]
        [String]$hvHost,
        [Parameter(Mandatory)]
        [PSCredential]$hvCreds,
        [Parameter(Mandatory)]
        [String]$hvVmName
    )
    #connect to hyperv host
    $screenshotData = Invoke-Command -ComputerName $hvHost -Credential $hvCreds -ScriptBlock {
        #import drawing package
        Add-Type -AssemblyName System.Drawing
        #get virtualization data using cim through wmi
        $msvsms = Get-CimInstance -Namespace root\virtualization\v2 -Class Msvm_VirtualSystemManagementService
        $mscs = Get-CimInstance -Namespace root\virtualization\v2 -Class Msvm_ComputerSystem -Filter "ElementName='$Using:hvVmName'"
        $msvh = Get-CimAssociatedInstance -InputObject $mscs -ResultClassName "Msvm_VideoHead"
        #get vm console resolution
        $xRes = $msvh.CurrentHorizontalResolution
        $yRes = $msvh.CurrentVerticalResolution
        #retrieve image from vm console
        $image = Invoke-CIMMethod -InputObject $msvsms -MethodName "GetVirtualSystemThumbnailImage" -Arguments @{
            "TargetSystem" = $mscs
            "WidthPixels" = $xRes
            "HeightPixels" = $yRes
        }
        #transform image data into bitmap
        $format = "format16bppRgb565"
        $bitmap = New-Object System.Drawing.bitmap -Args $xRes, $yRes, $format
        $rect = New-Object System.Drawing.rectangle -Args 0, 0, $xRes, $yRes
        $bitmapData = $bitmap.LockBits($rect, "ReadWrite", $format)
        [System.Runtime.InteropServices.Marshal]::Copy($Image.ImageData, 0, $bitmapData.Scan0, $bitmapData.Stride * $bitmapData.Height)
        $bitmap.UnlockBits($bitmapData)
        #store bitmap stream in memory with png image format
        $saveMemStream = New-Object System.IO.MemoryStream
        $bitmap.Save($saveMemStream, [System.Drawing.Imaging.Imageformat]::Png)
        Write-Output $saveMemStream.ToArray()
        $saveMemStream.Dispose()
        $bitmap.Dispose()
    }
    #load the stream from memory on vbr server and save to disk
    $loadMemStream = New-Object System.IO.MemoryStream(,$screenshotData)
    $bitmap2 = [System.Drawing.bitmap]::FromStream($loadMemStream)
    $bitmap2.Save("$($sureBackupDir)\$($vm.Name).temp")
    $loadMemStream.Dispose()
    $bitmap2.Dispose()
}
try
{
    #import credentials
    $veeamCreds = Import-Clixml -Path "$workingDir\veeam_creds.xml" -ErrorAction Stop
    $hypervCreds = Import-Clixml -Path "$workingDir\hyperv_creds.xml" -ErrorAction Stop
    #get event details
    $surebackupStart = Get-WinEvent -LogName "Veeam Backup" | Where-Object -Property RecordId -EQ $eventRecordID
    #get surebackup job id
    $jobId = $surebackupStart.Properties[1].Value
    Write-Output "start event details:"
    Write-Output $SurebackupStart | Select-Object -Property TimeCreated, Id, RecordID,  @{Name='Description';Expression={ $_.Properties.Value[-1] }}, @{Name='SureBackup Job ID';Expression={ $_.Properties.Value[1] }} | Format-List
    #connect to vbr
    Connect-VBRServer -Credential $veeamCreds -ErrorAction Stop
    #get surebackup job
    $sureBackupJob = Get-VBRSureBackupJob -Id $jobId -ErrorAction Stop
    Write-Output "surebackup job: $($sureBackupJob.Name)"
    $sureBackupDir = "$workingDir\$($sureBackupJob.Name)"
    #create directory for screenshots - recreate it if it already exists
    if (Test-Path -Path $sureBackupDir)
    {
        Remove-Item -Path $sureBackupDir -Recurse
    }
    $sureBackupDir = New-Item -Path $sureBackupDir -ItemType Directory
    #get hyperv virtual lab config
    $virtualLab = Get-VBRHvVirtualLabConfiguration -Name $sureBackupJob.VirtualLab.Name -ErrorAction Stop
    Write-Output "virtual lab: $($virtualLab.Name)"
    #get hyperv host
    $hyperv = Get-VBRServer -Type HvServer -ErrorAction Stop
    Write-Output "Hyper-V host: $($hyperv.Name)"

    $end = 0
    do
    {
        #look for event id 390 (surebackup job finished) with same event id
        $surebackupFinish = Get-WinEvent -LogName "Veeam Backup" | Where-Object {$_.RecordId -gt $eventRecordID -and $_.Id -eq 390 -and $_.Properties[1].Value -eq $jobId} -ErrorAction Stop
        if ($surebackupFinish)
        {
            Write-Output "finish event details:"
            $surebackupFinish | Select-Object -Property TimeCreated, Id, @{Name='Description';Expression={ $_.Properties.Value[-1] }} | Format-List
            #exit loop to disconnect and finish
            $end = 1
        }
        if ($end -eq 0)
        {
            #connect to hyperv host and look for surebackup vms - vms are suffixed with surebackup name in brackets
            $vms = Invoke-Command -ComputerName $hyperv.Name -Credential $hypervCreds -ScriptBlock {
                Get-VM | Where-Object {$_.Name -like "*($($using:sureBackupJob.Name))*" -and ($_.State -eq "Running")} -ErrorAction Stop
            }
            if ($vms)
            {
                Write-Output "----------"
                foreach ($vm in $vms)
                {
                    Write-Output "found vm: $($vm.Name)"
                    try
                    {
                        #call function to take screenshot of the vm console
                        Get-VMScreenshot -hvHost $hyperv.Name -hvCreds $hypervCreds -hvVM $vm.Name -ErrorAction Stop
                        try
                        {
                            #verify screenshot image not corrupted
                            $img = [System.Drawing.Image]::FromFile("$($sureBackupDir.FullName)\$($vm.Name).temp")
                            $img.Dispose()
                            #remove existing screenshot if it exists and replace it with new one
                            if (Test-Path "$($sureBackupDir.FullName)\$($vm.Name).png")
                            {
                                Remove-Item -Path "$($sureBackupDir.FullName)\$($vm.Name).png"
                            }
                            Rename-Item -Path "$($sureBackupDir.FullName)\$($vm.Name).temp" -NewName "$($vm.Name).png"
                            Write-Output "screenshot copy successful! - $($sureBackupDir.FullName)\$($vm.Name).png"
                        }
                        catch
                        {
                            #screenshot image corrupted - delete it
                            Remove-Item -Path "$($sureBackupDir.FullName)\$($vm.Name).temp"
                            Write-Output "screenshot image corrupted!"
                        }
                    }
                    catch
                    {
                        Write-Output "screenshot failed"
                    }
                }
                Write-Output "wait 30 seconds for next run"
                Start-Sleep 30
            }
            else
            {
                Write-Output "no vms found - wait 30 seconds and re-run"
                Start-Sleep 30
            }
        }
    }
    until ($end -eq 1)
    #disconnect session
    Disconnect-VBRServer -ErrorAction SilentlyContinue
}
catch
{
    $_
}
finally
{
    if ($debug -eq 1)
    {
        Stop-Transcript
    }
}

Leave a comment