If you’ve used Veeam Backup & Replication, you’re probably aware SureBackup is a great way to verify the integrity of your backups, providing assurance that your data is recoverable whenever you need it. It also plays a major role in complying with the 3-2-1-1-0 backup strategy and I highly recommend enabling it whenever possible.
Day to day, SureBackup typically hums along in the background with very little overhead. But as is life, there are times where something unexpected happens causing the job to fail. Veeam does a good job at providing clear error messages in the UI to help with the troubleshooting process however, there is one error message in particular that I find raises more questions than answers.
This error occurs when a server in the job fails to produce a heartbeat within in the allotted startup time. The main issue with the error message is that it provides no insight as to why a heartbeat wasn’t received. I completely acknowledge the fact that Veeam has no way of knowing what is going on under the hood of a VM from the OS layer, however it doesn’t make it any easier to troubleshoot!
Speaking of troubleshooting, the possibilities for the root cause in this type of situation are seemingly endless including anything from a BSOD, to applying outstanding Windows Updates. While some of these issues can be resolved by simply increasing the timeout value in the job, it won’t help resolve scenarios such as the aforementioned BSOD.
One possible workaround to this is to restore the troublesome VM in isolation and observe its behavior at boot. While this approach is feasible in small environments, it quickly becomes untenable at scale particularly in large enterprise environments.
The Solution
Encountering this issue more times than I’d like to admit, I decided to tackle it head on, determined to find a way make the troubleshooting process easier and quicker. After experimenting with a few different ideas, I found what I perceived to be a hidden gem:
https://williamlam.com/2023/01/automating-virtual-machine-screenshots-in-vsphere.html
The possibility to capture a screenshot of the VM console in vSphere came as a surprise to me, especially since it has been possible since 2013! Using this concept as the base to design the solution around, I created a script which interrogates SureBackup VMs while being tested to finally give us a sense of what might be causing those timeout error messages.
As this functionality is not natively built into the VBR product, the script has to run completely independently using Windows events as a means to keep track of the SureBackup jobs.
Follow on below to give it a try for yourself.
Step 1 – Pre-requisites & Limitations
The first thing to discuss is the requirements needed for everything to run successfully:
- VMware PowerCLI installed on VBR server
- PowerShell 5.1 or above
- VMware Virtual Lab & SureBackup job configured
- VBR & vCenter credentials stored in encrypted format (covered below)
In addition, the script has some limitations to be aware of:
- Script must run locally on the VBR server
- VMware environment support only (sorry Hyper-V users!)
- Only supports SureBackup jobs configured to process 1 VM at a time
- Only supports a single vCenter server added to Veeam Infrastructure
- Tested on VBR v12.3
Step 2 – The Script
At a high level, the script performs the following tasks:
- Retrieves event log ID from scheduled task
- Creates a working directory to store the screenshots and credential files (and optional logs)
- Imports VBR & vCenter credentials
- Gets associated SureBackup job ID
- Connects to VBR server
- Gets SureBackup job details including associated Virtual Lab
- Gets vCenter linked to the Virtual Lab
- Connects to vCenter server
- Gets vPower NFS Datastore and creates share to it
- Checks event log to see if SureBackup job has finished – if true moves to last step
- Looks for powered on VMs within the Virtual Lab folder in vCenter (every 10 seconds)
- Takes screenshot of the VM console and checks the image file integrity
- Copies image to the backup server and removes the original image from the datastore
- Repeat steps 12 & 13 if the VM is still available (every 30 seconds)
- Repeats steps 10-14 for remaining VMs in SureBackup job
- Disconnect all connections
Configuring the script is a straightforward process:
1. Copy the script
On your backup server open your text editor of choice.
Next click here and copy the contents of the script into your text file.
Now save the file somewhere on your backup server with a ps1 extension.
2. Set the working directory
By default the working directory is set to C:\Scripts\SureBackup_Screenshots (if the directory doesn’t exist it will be created).
If you want to change the path, find the below line near the top of the script and change the path between the quotation marks.
$workingDir = “C:\Scripts\SureBackup_Screenshots”
3. Create encrypted credentials
To prevent sensitive information being stored in plain text, all credentials are imported into the script from encrypted files. These files must be created using the same account that the scheduled task runs under for the script to import the credentials successfully.
You can use the example scripts below to create these files – if you changed the working directory in the previous step, update below script to reflect the correct directory.
VBR Credentials – Provide account with Veeam Backup Administrator role
$veeamCredentials = Get-Credential
$veeamCredentials | Export-CliXml -Path "C:\Scripts\SureBackup_Screenshots\veeam_creds.xml"
vCenter Credentials – Ensure provided account has permission to perform the below tasks in PowerCLI:
- Create screenshots
- Get datastores
- Get VMs
- Copy datastore files
$vcenterCredentials = Get-Credential
$vcenterCredentials | Export-CliXml -Path "C:\Scripts\SureBackup_Screenshots\vcenter_creds.xml"
4. Optional Steps
vCenter Certificate
If your vCenter server has an invalid certificate (self-signed for example) the script will fail to make a connection. In this case uncomment the line below in the script to bypass the certificate check.
Set-PowerCLIConfiguration -InvalidCertificateAction Ignore -Confirm:$false
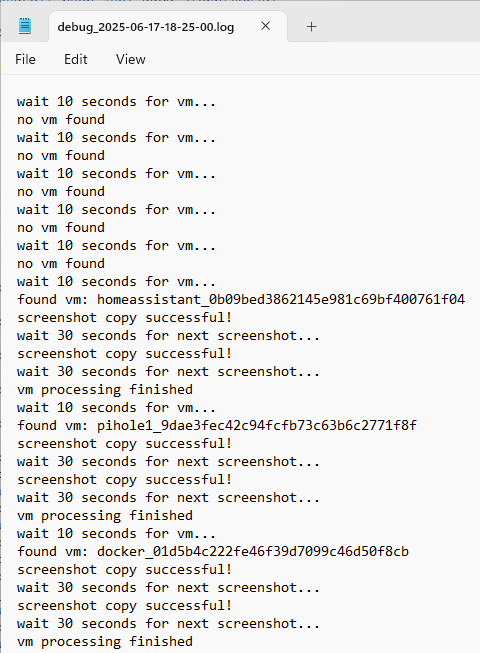
Logging
If you find the script isn’t capturing screenshots as you would expect, you can enable logging to check for errors and pinpoint what went wrong.
- Find the line $debug = 0 near the top of the script
- Change 0 to 1 and save the file
- Log files are suffixed with a timestamp and stored within the working directory.
Step 3 – Scheduling
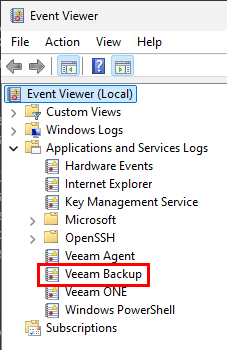
Scheduling the execution of the script is handled by a scheduled task. Most VBR specific events that occur are logged in the Windows Event Log on the backup server including those relating to SureBackup – this is what we’ll use to trigger our task.
For reference, the link below contains a list of all Veeam related events that get logged:
https://helpcenter.veeam.com/docs/backup/events/event_id_list.html?ver=120
Creating the scheduled task requires a little bit of work up front but only needs to be completed once:
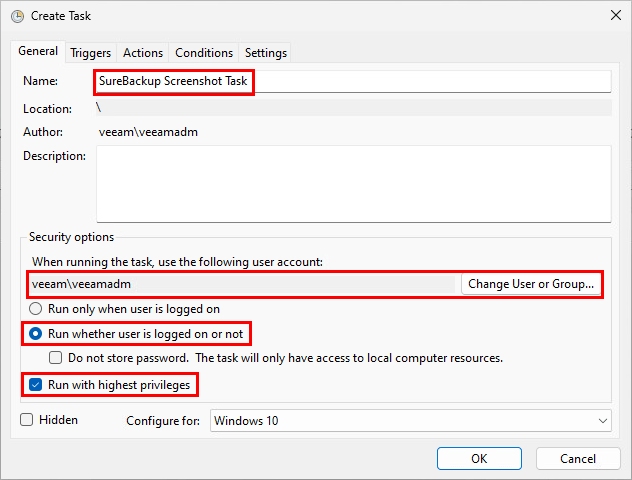
Start by opening task scheduler and creating a new task. On the General tab give the task a name. Under the Security options section set the user account, making sure it has local administrator rights. Ensure the Run whether user is logged on or not option is selected and ensure Run with highest privileges is checked.
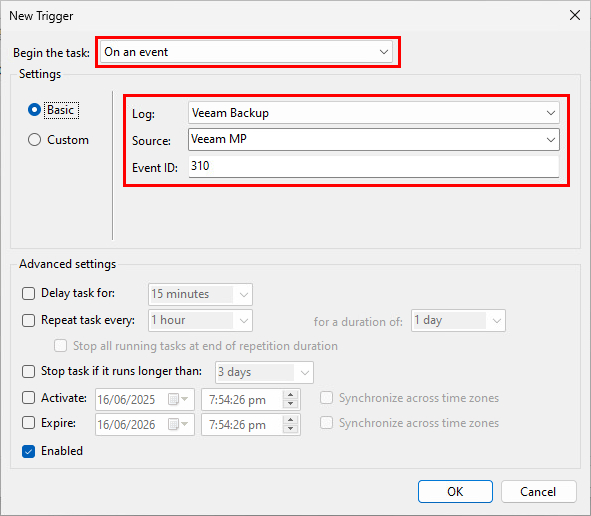
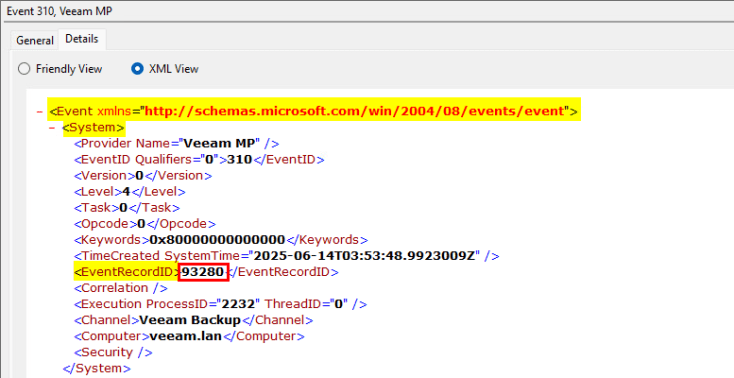
On the Triggers tab click New and change the Begin the task dropdown box to On an event. Select Veeam Backup for the Log, Veeam MP for the Source and 310 for the Event ID which corresponds to ‘SureBackup Job Started’.
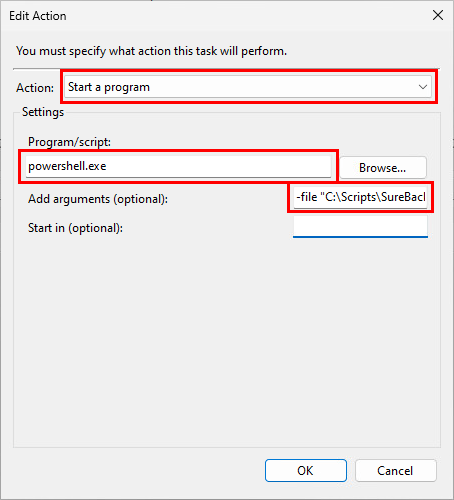
On the Actions tab click New, ensuring Action is set to Start a program. In the Program/script text field enter powershell.exe. In the Add arguments text field enter:
-file “<path to powershell script>” -eventRecordID $(eventRecordID)
Theres a fair bit going on here so let’s break it down to understand what it all means.
powershell.exe is fairly self-explanatory – we are telling the scheduled task to start a PowerShell session when triggered. Next we are providing 2 arguments:
- -file “<path to powershell script>” – the file parameter allows you to specify the path of a PowerShell script to run within the session. Enter the path to the PowerShell script you saved on your backup server in Step 2 earlier.
- -eventRecordID $(eventRecordID) – this relates back to the first few lines of the PowerShell script which is expecting a parameter to be passed to it when called. This will make more sense in a few moments when we configure the task to return an Event ID.
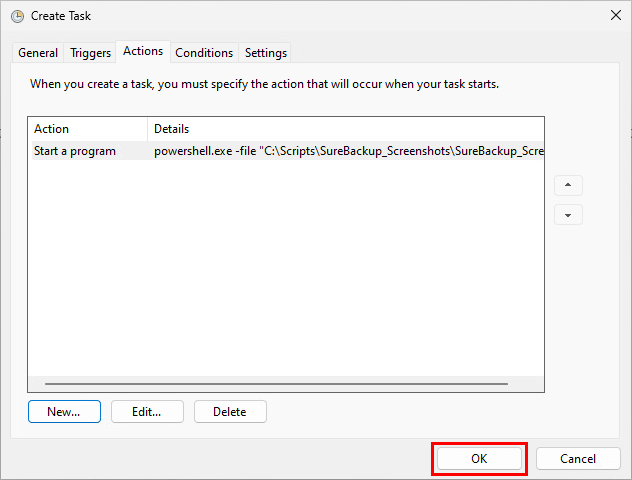
After clicking OK to the above window, click OK once more and finally when prompted, enter the credentials of the account selected in the earlier step to create the task.
That’s the bulk of the work complete but we need to complete one last step so that the Event ID can be passed through to the script:
First export the scheduled task out to a file (right click task > Export) and open it in a text editor.
Next we need to add the below lines into the EventTrigger section of the file then save it.
      <ValueQueries>
        <Value name="eventRecordID">Event/System/EventRecordID</Value>
      </ValueQueries>
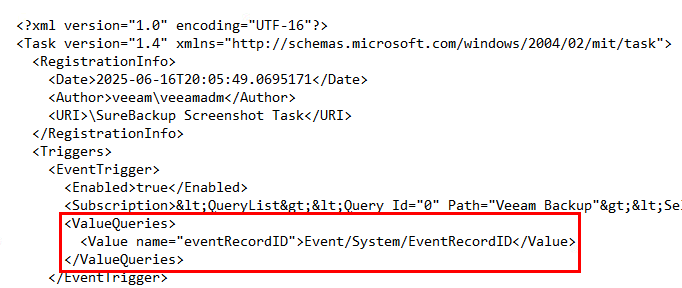
- Value name=”eventRecordID” – this value should match the parameter name configured during the creation of the scheduled task.
- Event/System/EventRecordID – this relates to the value we want to pass from the task into the script as highlighted below.
Before we can import the modified XML file back in, first delete the existing task (right click task > Delete).
Now import the task back in using the Import Task option – no edits need to be made on the Create Task window, just click OK and re-enter the credentials.
Walkthrough
Now that everything’s setup and ready to go, let’s run through running a SureBackup job and checking the screenshots produced by the script.
A few quick reminders before running the job:
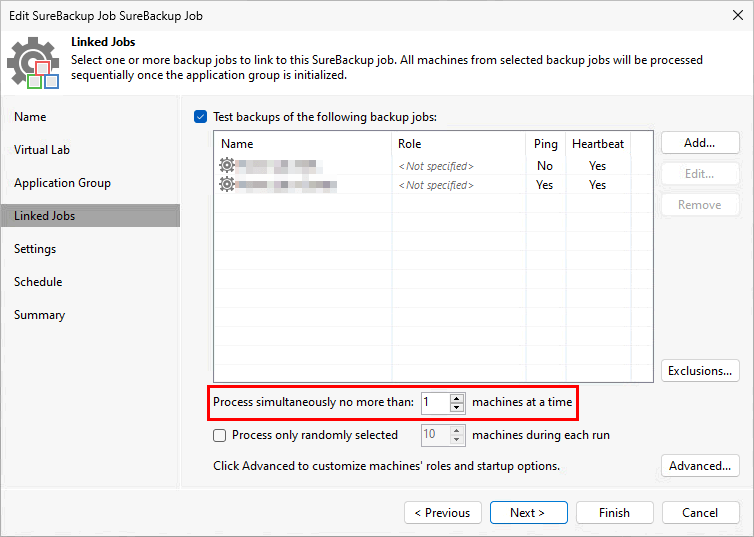
The SureBackup job must be set to process 1 machine at a time for the screenshots be to processed correctly.
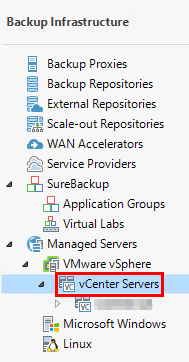
Only 1 vCenter server can be added under Managed Servers. Having more than 1 vCenter added will have adverse effects on the script.
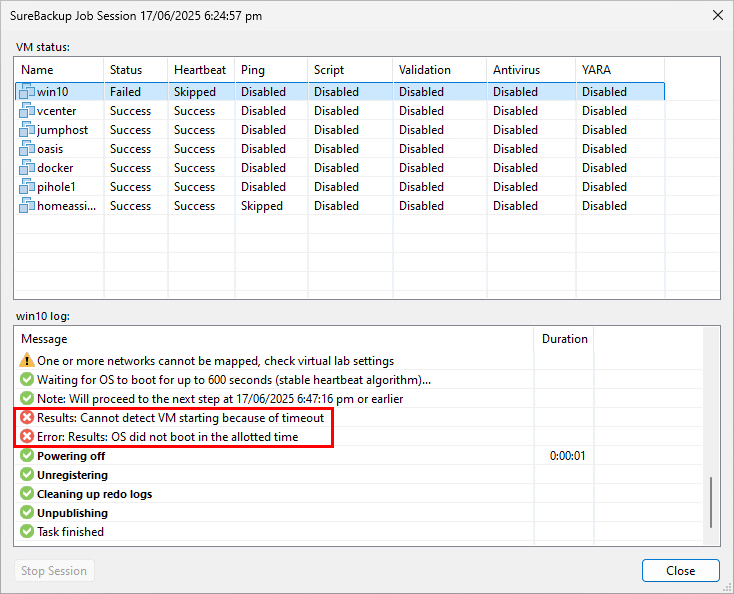
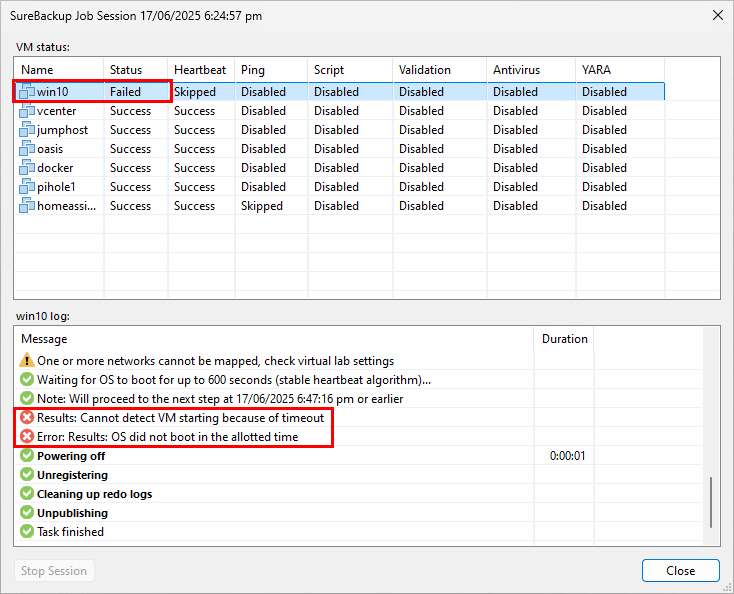
Soon after starting the job and VMs begin to power on, you should see the screenshots directory begin to populate with image files. After the job completes, you can see that one of my VMs failed with the timeout message:
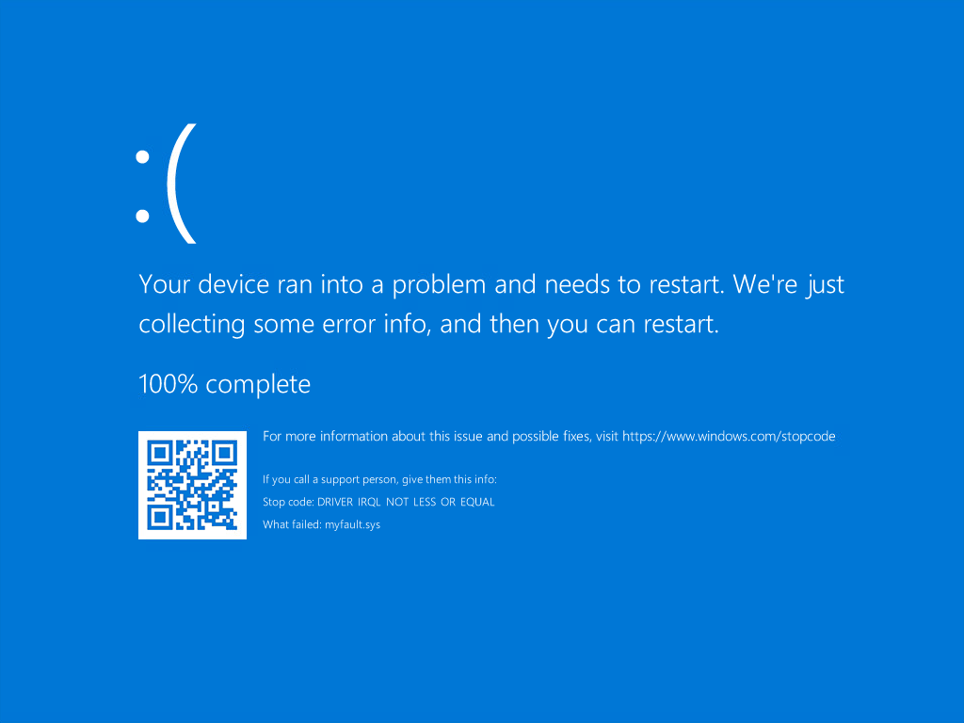
Let’s use the generated screenshots to see what state the VM was in when it was powered on by the job. Within the working directory will be a folder with the same name as your SureBackup job name, containing the screenshots. Using the filenames we can quickly find which screenshot belongs the failed VM, clearly showing a BSOD to be the cause of the timeout.
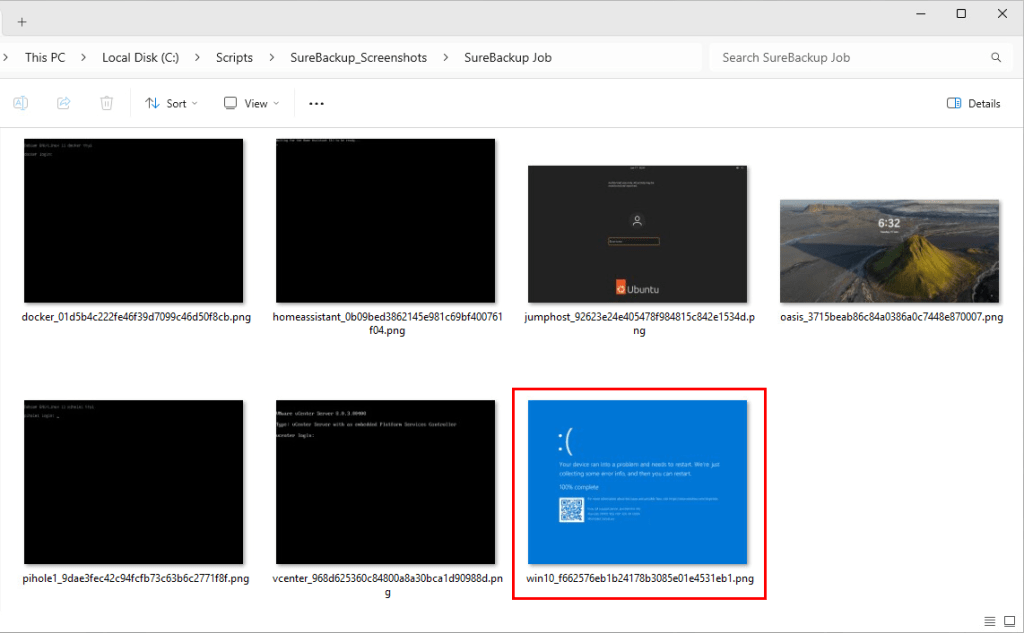
Make sure to make a copy of any screenshots you want to keep – the script deletes all the files as part of the cleanup process next time it runs.
Wrap Up
So there you have it. What started off as trying to find a simple solution to a specific SureBackup issue turned into a mini project with learnings made along the way. While I’ll admit the script has room for improvement, I’m pleased with the end result and hopefully it can help someone else down the line.
A quick search on the Veeam R&D forums suggests this is a topic that has been discussed before. I’m unsure if there is high demand for a feature like this but personally, I’d love to see something added into the product natively in a future release.
Full Script
#pass EventRecordID into script
param(
    $eventRecordID
)

$workingDir = "C:\Scripts\SureBackup_Screenshots" #set working directory
if (-not (Test-Path -Path $workingDir))
{
    New-Item -Path $workingDir -ItemType Directory
}
Add-Type -AssemblyName System.Drawing

$debug = 1 #set to 1 to output to log file
if ($debug = 1)
{
    Start-Transcript -Path "$workingDir\debug_$(Get-Date -f 'yyyy-MM-dd-HH-mm-ss').log"
}
try
{
    #import credentials
    $veeamCreds = Import-Clixml -Path "$workingDir\veeam_creds.xml" -ErrorAction Stop
    $vCenterCreds = Import-Clixml -Path "$workingDir\vcenter_creds.xml" -ErrorAction Stop

    "event id: $eventRecordID"

    #get event details
    $surebackupStart = Get-WinEvent -LogName "Veeam Backup" | Where-Object -Property RecordId -EQ $eventRecordID
    "start event details:"
    $surebackupStart
    #get surebackup job id
    $jobId = $surebackupStart.Properties[1].Value

    #connect to vbr
    Connect-VBRServer -Credential $veeamCreds -ErrorAction Stop

    #get surebackup job
    $sureBackupJob = Get-VBRSureBackupJob -Id $jobId -ErrorAction Stop
    "sure backup job details:"
    $sureBackupJob
    $sureBackupDir = "$workingDir\$($sureBackupJob.Name)"

    #create directory for screenshots
    if (Test-Path -Path $sureBackupDir)
    {
        Remove-Item -Path $sureBackupDir -Recurse
    }
    $sureBackupDir = New-Item -Path $sureBackupDir -ItemType Directory

    #get virtual lab config
    $virtualLab = Get-VBRViVirtualLabConfiguration -Name $sureBackupJob.VirtualLab.Name -ErrorAction Stop
    "virtual lab details:"
    $virtualLab

    #get vcenter
    $vCenter = Get-VBRServer -Type VC -ErrorAction Stop
    "vCenter:"
    $vCenter

    #connect to vcenter
    #Set-PowerCLIConfiguration -InvalidCertificateAction Ignore -Confirm:$false #enable this if your vcenter has an invalid certificate
    Connect-VIServer -Server $vCenter.Name -Credential $vCenterCreds -ErrorAction Stop

    #get vpower nfs datastore and map it
    $datastorePath = Get-Datastore | Where-Object {$_.Name -like "VeeamBackup*"}
    "datastore details:"
    New-PSDrive -PSProvider VimDatastore -Name "screenshots" -Root $datastorePath.DatastoreBrowserPath -ErrorAction Stop

    $end = 0
    do
    {
        #look for event id 390 (surebackup job finished) with same event id
        $surebackupFinish = Get-WinEvent -LogName "Veeam Backup" | Where-Object {$_.RecordId -gt $eventRecordID -and $_.Id -eq 390 -and $_.Properties[1].Value -eq $jobId} -ErrorAction Stop
        if ($surebackupFinish)
        {
            "finish event details:"
            $surebackupFinish

            #exit loop to disconnect and finish
            $end = 1
        }

        if ($end -eq 0)
        {
            #wait for vm to appear in virtual lab folder
            Sleep 10
            "wait 10 seconds for vm..."
            #look for vm
            $vm = Get-VM -Location $virtualLab.DesignatedVMFolderName | Where-Object {$_.Name -ne $($virtualLab.ProxyAppliance) -and ($_.PowerState -eq "PoweredOn")} -ErrorAction Stop
            if ($vm)
            {
                "found vm: $($vm.Name)"
                do
                {
                    $vm2 = Get-VM -Location $virtualLab.DesignatedVMFolderName | Where-Object {$_.Name -ne $($virtualLab.ProxyAppliance) -and ($_.PowerState -eq "PoweredOn")}
                    if ($vm2 -contains $vm)
                    {
                        #take screenshot of the vm console
                        $screenshot = $vm.ExtensionData.CreateScreenshot_Task()
                        $screenshotTask = Get-Task -Id ("Task-$($screenshot.value)")
                        $screenshotPath = $screenshotTask | Wait-Task
                        $screenshotPath = $screenshotPath.Split("] ") | Select -Last 1

                        #check screenshot still exists
                        if (Test-Path -Path "screenshots`:\$screenshotDir")
                        {
                            #copy screenshot from datastore to disk"
                            Copy-DatastoreItem "screenshots`:\$screenshotPath" "$($sureBackupDir.FullName)\$($vm.Name).temp"
                            try
                            {
                                #verify screenshot image not corrupted
                                $img = [System.Drawing.Image]::FromFile("$($sureBackupDir.FullName)\$($vm.Name).temp")
                                $img.Dispose()
                                #remove existing screenshot if it exists and replace it with new one
                                if (Test-Path "$($sureBackupDir.FullName)\$($vm.Name).png")
                                {
                                    Remove-Item -Path "$($sureBackupDir.FullName)\$($vm.Name).png"
                                }
                                Rename-Item -Path "$($sureBackupDir.FullName)\$($vm.Name).temp" -NewName "$($vm.Name).png"
                                "screenshot copy successful!"
                            }
                            catch
                            {
                                #screenshot image corrupted - delete it
                                Remove-Item -Path "$($sureBackupDir.FullName)\$($vm.Name).temp"
                                "screenshot image corrupted!"
                            }
                            finally
                            {
                                #delete screenshot from datastore
                                if (Test-Path "screenshots`:\$screenshotPath")
                                {
                                    Remove-Item -Path "screenshots`:\$screenshotPath"
                                }
                            }
                        }

                        Sleep 30
                        "wait 30 seconds for next screenshot..."
                    }
                    else
                    {
                        "vm processing finished"
                    }
                }
                until ($vm2.Name -ne $vm.Name)
            }
            else
            {
                "no vm found"
            }
        }
    }
    until ($end -eq 1)

    #disconnect sessions
    Remove-PSDrive -Name "screenshots" -ErrorAction SilentlyContinue
    Disconnect-VIServer -Confirm:$false -ErrorAction SilentlyContinue
    Disconnect-VBRServer -ErrorAction SilentlyContinue
}
catch
{
    $_
}
finally
{
    if ($debug -eq 1)
    {
        Stop-Transcript
    }
}

Leave a comment