In my last blog post I covered Support Integration with the recently released Veeam Service Provider Console V8. In this post I’ll be continuing to focus on VSPC, specifically remotely upgrading Veeam Backup & Replication. This feature allows you to initiate an upgrade of Veeam Backup & Replication on client or hosted computers without having to access the backup servers themselves.
If you struggle to find the time to fit upgrades into your busy working schedule or just find the process a bit tedious, read on because this might be the answer you have been looking for.
Remote upgrades have many benefits over running an upgrade manually:
- Schedule the upgrade to occur at a specified date and time
- Handles the download of the ISO
- Upgrade multiple backup servers within a single task
This has the potential to save a lot of time and would be extremely useful for anyone who manages VBR instances at scale such as MSPs.
So let’s walkthrough to process to show how easy it is to perform an upgrade using this method.
If you aren’t running the latest version of VSPC V8 yet, it is still possible to perform these steps with V7. The upgrade path for VBR is also flexible too – upgrading to V12.1 is possible all the way back to V10a!
Prerequisites
There are a couple of tasks that should be completed before you begin the upgrade.
- Stop and disable all active jobs and finish all restore processes
- Perform a configuration backup
- Close the Veeam Backup & Replication console
Most of these tasks can actually be handled automatically by the VSPC – more on that below.
Currently the configuration backup has to be taken outside of VSPC. This can be achieved by running it manually from the backup server however that defeats the purpose of a remote upgrade and is not feasible at scale. A better way to go about this would be to schedule the upgrade to start just after the scheduled configuration backup completes – I’ll cover this a bit later on.
Upgrade Process
Now onto the upgrade process itself. First head to Discovery and click on the Backup Servers tab.
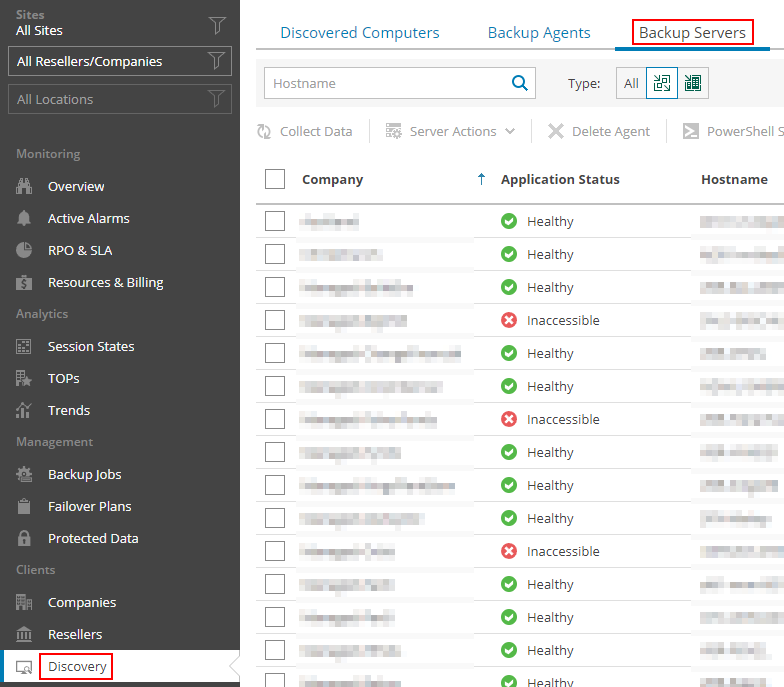
Next select one or more backup servers you want to upgrade. In this example I’ll be upgrading from V12 to V12.1.

Now click on Server Actions and choose Upgrade which opens the Upgrade Backup Server wizard.

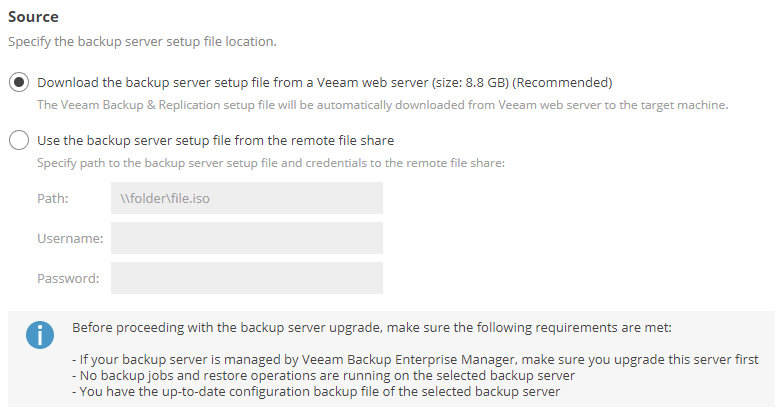
The first step is to choose what source to use for the upgrade. By default the VSPC management agent on the remote backup server will download the installation files via the internet – this is the easiest and recommended option. If your server doesn’t have internet access, not to worry, the upgrade is still possible. You will need to make sure the ISO is available on the remote server and provide the file share path and credentials for the VSPC management agent to access it. In this instance, before the upgrade process begins the ISO is first copied from the location you defined into a folder within C:\ProgramData\Veeam.
Either way make sure there is enough space to store the ISO and perform the upgrade. Once the upgrade is complete the ISO is automatically deleted.
Next enter the account to be used to run the installer on the backup server. The selected account must have local administrator permissions on the remote computer. If you selected multiple backup servers to upgrade in the previous step, the username and password must be identical for each of them.

The Setup Options step requires a configuration file in XML format. The configuration file contains parameters which determines which options should be used during the installation.
Click the Configuration File Sample link to download the file.

Use the View Help link to see more information on what each parameter does.

The first 4 parameters relating to license agreements are required and by default will have an empty value in the sample file. Open the downloaded XML file and enter 1 for the value of each.

The remaining parameters are optional and are already configured in the sample file. Look through these and set them to your liking then save the file.
The only change I will make here is to set VBR_AUTO_UPGRADE to 1. This will save having to manually log onto the backup server after the upgrade to upgrade the out of data infrastructure components.
Click the Browse link and select the XML file then click Next.

The last step involves scheduling the upgrade. By default this will happen immediately however it can be changed to run at a later date by selecting Scheduled upgrade and choosing a date/time from the calendar.
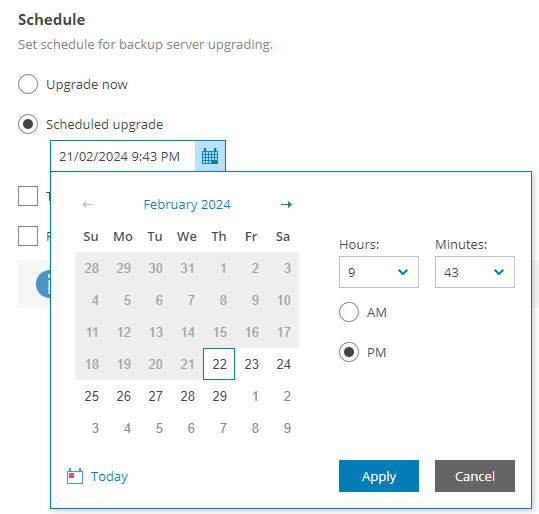
This is a great way incorporate your configuration backup into the automated upgrade process. For example, you could schedule the upgrade to begin 30 minutes after the time the configuration backup is scheduled for. That should give you enough time to check the configuration backup completed successfully beforehand. In the event that the configuration backup fails, you can simply reschedule or cancel the upgrade using the link in the Scheduled Updates column on the Backup Servers tab. If you are planning to upgrade multiple VBR servers in bulk this method will still work provided they share the same configuration backup schedule.
Underneath the scheduling options are a few checkboxes:
The Terminate all activities automatically before install check box can be used to satisfy the prerequisites mentioned earlier. Selecting this will instruct Veeam to stop active backup jobs, temporarily disable scheduled jobs and close Veeam Backup & Replication console before the upgrade begins. A few things to bear in mind when selecting this:
- Active restore jobs will not be stopped
- Sometimes jobs cannot be gracefully stopped automatically
Selecting the Reboot automatically if required check box will perform a reboot of the backup server after the upgrade is complete if it’s required.
For demonstration purposes, I will select both of these checkboxes to ensure the prerequisites are met and to prevent the need to access the backup server manually to perform a reboot.

Finally, the Summary page shows a nice overview of the overall upgrade configuration. I like that it also gives you an opportunity to review the parameters selected in the XML file.

Once you click Finish you will be taken back to the Backup Servers tab and the upgrade process will begin.
Monitoring the Upgrade
The Update Status column for the backup server will change to Upgrading – this is a clickable link which will open a task session window, showing the progress of the upgrade.

Once the upgrade is complete click the Close button. The Update Status column for the backup server will change to Success. The Server Version column will show the upgraded version number and the Available Updates column will now show Up-to-date.

If something does happen to go wrong during the upgrade, you can use the Download Logs button to investigate further.

As a final check it’s worth confirming that your backup jobs have been enabled again.
Wrap Up
As you can see the process is quite straightforward. The XML configuration file takes a bit of time to get to grips with initially but once you have it set to your liking, I doubt it will need to be changed very often. Performing upgrades this way has so many advantages over the manual process. When the time comes to perform your next upgrade, consider this as your go to option!
