
If you have been following my previous posts you’ll know I’ve recently built a home lab environment with an Intel NUC running ESXi. I briefly mentioned in one of those posts that I have a few physical systems that I’ve been looking to virtualise since I now have a bunch of storage and compute available. One of those systems was my Home Assistant instance.
When I initially began looking into what the migration path might look like, I didn’t expect it to be as easy as it was. There are many migration path possibilities depending on your device and scenario. I migrated from a Raspberry Pi 4 onto a Linux based virtual machine however the nice thing here is that no matter the devices involved, the process remains the same. Before starting the migration, there are a few things that need to be in place.
Pre-requisites
First, we need to provision the new HA on the new hardware. HA is supported across a wide variety of platforms. Allthe installation processes are documented here – follow the one that applies to you. Installing the same version as your current HA system here will make for a more reliable migration. Stop at the point where you navigate to the new HA via a browser and the page looks like below.

Next we need to have a successful full backup of the current HA system. Hopefully you are backing up HA on a regular basis – having to start from scratch in the event of a disaster would be a daunting task and is not an option for most. Unfortunately HA only supports taking manual backups out of the box but there are third party add-ons available to ensure you have regular backups should you need them. One way to achieve this is with the Home Assistant Google Drive Backup add-on. It does require a Google Drive account but gives you greater backup flexibility through schedules, retention and offsite cloud storage. It is a good idea to take a backup just before you plan to begin the migration. This will ensure any recent changes within HA are captured resulting in little to no data loss.
However you choose to backup HA, the steps to download a local backup will be the same. Head to Settings > System > Backups. The most recent backup is shown at the top of the list by default. Click the name and ensure Full backup is selected. Click the 3 dots and then select Download Backup. Save the backup file to your local machine for later.

Now power off the old HA system. This part is important since we will be reusing the IP address for the new system and don’t want any IP conflicts.
Performing the Migration
Head back to the browser page of the new HA. Step through the initial setup wizard as documented here. It’s worth mentioning that whatever is entered during the wizard is not of any relevance since it will be shortly overwritten when we restore from our backup. You may have also noticed the Alternatively you can restore from a previous backup link right at the beginning of the setup wizard. Although it is possible to restore the backup this way, there have been reports from users that it can be unreliable and sometimes times out so I won’t cover it here.
The next step is optional however recommended and involves configuring your IP address. Doing this before restoring the backup makes things much easier and will cause is a lot less hassle than trying to do it later on.
- If a DHCP reservation was used for the old HA system, update the MAC address reservation on your DHCP server to that of the NIC connected used by your new HA hardware. There is nothing to configure in HA since DHCP is configured by default for new installations.
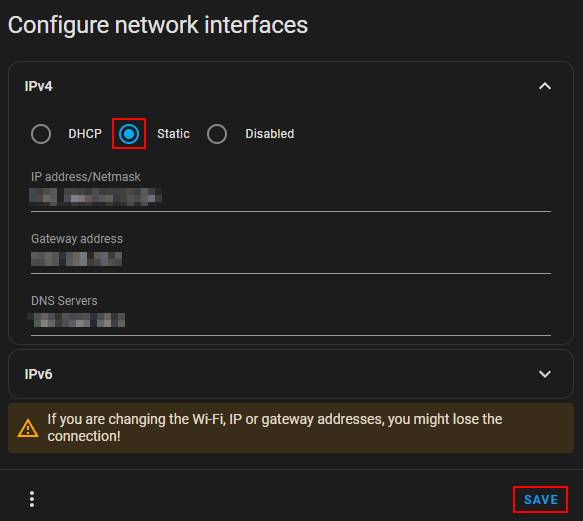
- If you were using a static IP, head to Settings > System > Network and under Configure network interfaces select IPv4. Now select Static and configure the same IP details as on your old HA instance the click Save.
Now head to Settings > System > Backups click the 3 dots in the top right and select Upload backup and wait for the upload to complete. At this point the backup should appear in the list (it will be the only one). Click the name and ensure Full backup is selected then click RESTORE and RESTORE once more to confirm.


Depending on the size of your old HA instance this process may take a while and you may see the message Connection lost. Reconnecting… appear in the bottom left corner.
One thing to bear in mind during the restore is if your old HA instance was setup with HTTPS, the page will never update even after the restore is complete. This is due to the new HA installation running over HTTP – once the old HA backup has been restored, it will only be accessible via HTTPS. If this applies to you, simply update the URL to https and reload the page.
Once the restore has completed you will be prompted to log back in. Use the same credentials from your old HA instance. You should now be presented with a system that looks identical to your old HA from the time the backup was taken. And that’s it, migration complete!
I did encounter a slight issue post migration with my add-ons. Although they were running as expected, they showed as greyed out from the UI with their options inaccessible. This appears to be a known issue which is resolved by restarting the system.
https://community.home-assistant.io/t/add-ons-not-working-properly-after-snapshot-restore/449796: Home Assistant P2V Migration
Leave a comment